Let's Design and Build a (mostly) Digital Theremin!

Posted: 9/18/2020 12:58:47 PM
pitts8rh

From: Minnesota USA

Joined: 11/27/2015

I have a bunch of questions, some comments, and a little pleading.

If you want to just quote this and add your replies I will delete the original post to keep the bulk down.

First I have a bunch of questions about certain parameters that I haven't figured out. This image of the librarian main screen is here to help me remember the things I want to ask about.


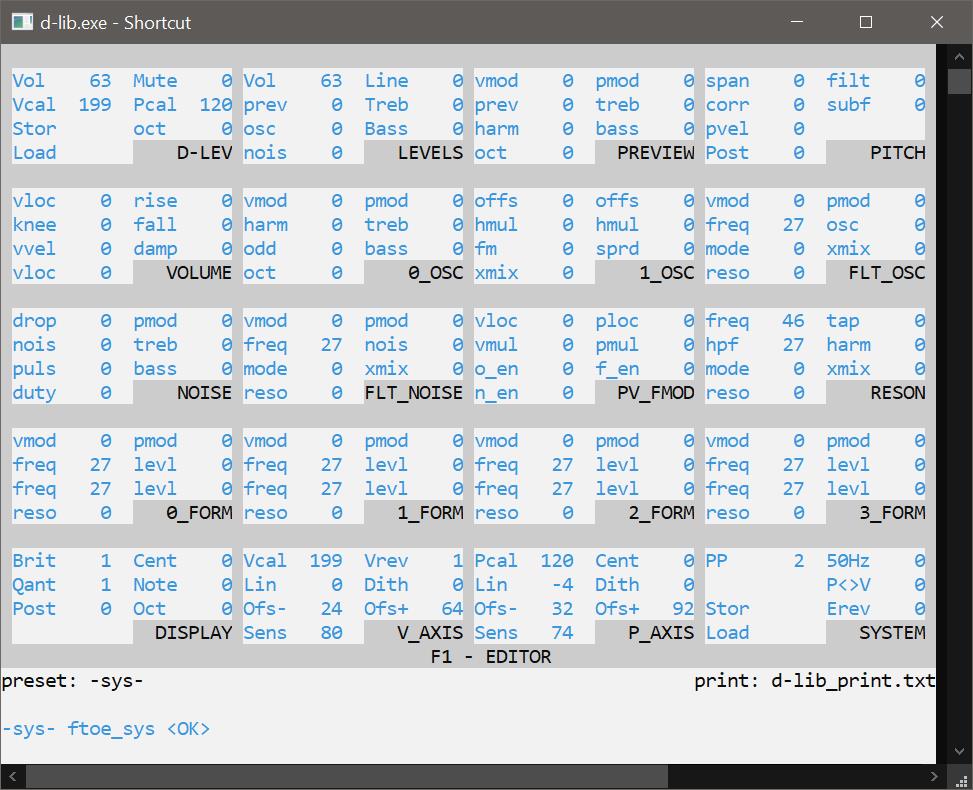
Could you give a short description of what the following parameters do?

PITCH:
1) filt
2) subf

VOLUME:
3) damp
4) the lower vloc

FLT_OSC:
5) Do vmod and pmod affect the frequency or the mix?

PV_FMOD:  (basically everything)
6) vloc
7) ploc
8) vmul
9) pmul
10) o_en
11) f_en
12) e_en

Most of the settings for NOISE and 1_OSC are still a mystery to me but you have either explained them in the past or I can figure them out on my own.


Comments & observations:

Now that the software has stabilized a bit and the hardware is working perfectly I've been spending quite a bit of time learning to make my own presets and just simply practicing.  In many cases I've been starting with your presets while comparing the theremin sounds to actual instrument samples and those of recordings that I play along with.

Here are a few interesting observations that I have made, in no particular order.  You have no doubt run into some of these things yourself.

1) Instrument presets that sound good by themselves often don't blend well with recordings or even with accompaniment unless the harmonic content is reduced.  This is really noticeable when trying to play along with a recording.  It's probably the ambience of the recording environment, but I notice the same thing with the sampler outputs.  They are simply too bright and have too much presence.  So I'm keeping separate "solo" and "play along" versions of some of the strings.

2)  Although I've shunned any pitch correction to this point, I've lately been trying it with the miserably-difficult-to-play string presets and I think I like it!
Dialing in just enough to broaden the pitch landings really helps sweeten the sound.  I'm conflicted about using it, because the perception (at times mine included) is that pitch correction is something that fixes imprecise technique.  But to the contrary, one of the reasons I avoid it is because it actually takes a great deal of precision to be able to use it effectively; you have to be able to hit the right notes to start with or you will get pulled to the wrong adjacent note. But lately it's starting to show its value, and I think I'll get over my theremin purity thing.  Those string presets with the resonances sound great but are damn near impossible to play.

We have had the discussion about this before, and I think you and I agreed that if the theremin wants to play with the other kids in the orchestra it needs to be able to hold its own without making the audience occasionally cringe at clinker notes.  A thereminist should ideally not have to preface a performance with an apology and explanation that the theremin is very difficult to play, so you should cut them some slack. I don't know what Katica's secret is, but she is the only performer that I can trust to stand up to the orchestra.

3)  Pitch Preview:  After having tried all kinds of different blends to make it work without confusing me, I think I've settled on settings that are the complete opposite of what I started with.  In the beginning I preferred having negative vmod so that the PP would be loud enough to hear when the main audio was at cutoff, and as the main volume came up the PP would drop out.  Even after some time that always felt a little weird.  So then I went to a constant level for the preview, and that works like the EW Plus except of course the D-Lev has the harmonic and modulation modifiers that make a huge audibility difference.

But lately I've been setting vmod at +20 with the volume (prev) at +50, harm at 10 and my usual pmod at -20 to flatten the perception level.  This brings in just a hint of the pitch a little ahead of the main audio, and I never would have believed it but this seems the most natural.  The D-Lev pitch preview functionality has something for everyone, and I finally have gotten used to using it regularly now (through a monitor, not an earpiece).

4) Something I just came to realize a few days ago:  the D-Lev is largely immune to proximity effects of adjacent equipment. My equipment cluster is getting pretty dense around the theremin, and this would be having quite a large effect on the analog theremins.  None of this seems to bother the D-Lev.  I guess it just calibrates out during ACAL.

5) Along the same lines as 4) above, I came to notice that the body of the theremin has a large and quite obvious shielding effect that further isolates the volume and pitch sides.  I've always been amazed at pitch linearity and how you can still have normal span octave jumps even with your hand pulled up against your chest.  Since I play with quite a large pitch field (pitch antenna at tip of thumb) I started wonder why the volume hand never seems to pull lower pitches as it does on the EW and Subscope.  It turns out that lateral movements of the volume hand (orthogonal to normal playing) have virtually no effect on pitch until you start to move past approximately the midpoint of the theremin body toward the pitch antenna.  It's a surprisingly sharp barrier, too. The analog theremins are always shifting around at low pitches when you have large volume changes, despite the orthogonal movements. 

I can't think of any other comments at the moment, but I have...


A Request and a Plea for "pmod" control over "reso":

After a lot of time trying everything available in the toolbox for creating reasonably realistic string sounds, I feel that the resonator needs some added functionality.  The biggest issue is that the "reso" parameter currently has to be a compromise. It has to be high enough to sound like a real instrument and keep the bass from sounding too sawtoothy but low enough to prevent too much sizzle or change in timbre of adjacent notes at higher pitches.  I think this would be much improved if "pmod" could be applied to "reso" so that the resonance could be throttled back at higher pitches.  I've tried everything I could think of to allow a resonant bass without thin and edgy highs: FLT_OSC, pmod and vmod applied to 0_OSC, etc.  I've also manually tried to adjust "mix" with pitch, but it seems that modulating resonance with pitch is more effective.

In direct comparison with my keyboard sampler it also seems that a slight pmod influence over the resonator frequency could also be beneficial, but if trying to keep things simple I think that pmod>reso is more important.  But where do you put it, even if you could do it easily?

That's enough for one post, I think .

Posted: 9/18/2020 7:19:51 PM
dewster

From: Northern NJ, USA

Joined: 2/17/2012

Roger, here's the UI doc with some info added today: [LINK].  It's not complete by any means but I tried to address most of your questions.

"2)  Although I've shunned any pitch correction to this point, I've lately been trying it with the miserably-difficult-to-play string presets and I think I like it!
Dialing in just enough to broaden the pitch landings really helps sweeten the sound.  I'm conflicted about using it, because the perception (at times mine included) is that pitch correction is something that fixes imprecise technique.  But to the contrary, one of the reasons I avoid it is because it actually takes a great deal of precision to be able to use it effectively; you have to be able to hit the right notes to start with or you will get pulled to the wrong adjacent note. But lately it's starting to show its value, and I think I'll get over my theremin purity thing.  Those string presets with the resonances sound great but are damn near impossible to play."  - pitts8rh

Hell must be freezing over! :-)  I'll have you playing plates and staring at the tuner non-stop before this is over! ;-)  I keed.

Pitch correction is something I use 100% of the time and I'm pretty sure it improves my playing 90% of the time, though just due to its nature it will fight you now and then.  If you dial "subf" down below "filt" it will correct faster during quiet intervals (you can hear this via PP), which might help you hit notes following silence better.  And as you note, some voices are super revealing in terms of pitch errors, others hide all sorts of pitch sins.

"The D-Lev pitch preview functionality has something for everyone, and I finally have gotten used to using it regularly now (through a monitor, not an earpiece)."

I'm glad to hear this!  There seems to be an inordinate amount of acclimating associated with everything Theremin (I feel your pain).

"4) Something I just came to realize a few days ago:  the D-Lev is largely immune to proximity effects of adjacent equipment. My equipment cluster is getting pretty dense around the theremin, and this would be having quite a large effect on the analog theremins.  None of this seems to bother the D-Lev.  I guess it just calibrates out during ACAL."

The axes are filtered to freakin' death.  Though it is unfortunately after squaring up in the AFE, so anything above 1/2 the operating point can get through.  From what I've seen on the scope though, the lion's share of interference is mains hum.

"The biggest issue is that the "reso" parameter currently has to be a compromise. It has to be high enough to sound like a real instrument and keep the bass from sounding too sawtoothy but low enough to prevent too much sizzle or change in timbre of adjacent notes at higher pitches."

The resonator has remained a "work in progress" for a long time.  At one point (salad days when there was more knob room available) I had the feedback (reso) and 1st order lowpass filter cutoff frequency of the feedback as separate knobs (I've noticed that reverbs usually have these separate).  But I found myself constantly adjusting them together, so I combined them.  But the combination function is ad-hoc, and could probably benefit from some analysis and refinement.  It might be possible to pull in the pitch axis number as a modulator, but do so in a fixed way in the background (good idea!).

Posted: 9/19/2020 7:33:42 PM
dewster

From: Northern NJ, USA

Joined: 2/17/2012

Resonator Update

I messed with the resonator for a while today and ended up tweaking it just a bit:

- Resonator lp_x := (~freq[0:127] << 25)^2
  The squaring is new, and makes decay times more constant over freq.

You can hear it here: [MP3].  Here's a schematic view of the resonator I posted some time back (still valid):

The squaring is for the "XMIX" input in the above sketch, which controls the crossfade between the input and output of the low pass filter, the result of which gets fed back to recirculate in the overall delay structure.

The resonator frequencies in that recording are 150, 300, 600, 1200, 2400, 4800, and 9600Hz.  For each frequency, the groups of 3 samples resonances are -22, -32, -42, -32, -22 (negative resonances invert the feedback and are somewhat easier to hear).  The transition point between "woody" and "bell-like" seems to be around -32, which conveniently is the 1/2 way point for the resonance knob.

I performed this test completely hands-off, and not even near the D-Lev, via the librarian SW.  You can adjust the Vcal and Pcal knobs in the librarian, so I just cranked on those until I got sufficient stimulus with high harmonic ramp set to -7 octave.  It's kinda wild editing it remotely.

After the edit, some of my bell patches need the resonance turned down a bit, but that's about it I think for blowback on the presets.

Posted: 9/19/2020 8:00:18 PM
dewster

From: Northern NJ, USA

Joined: 2/17/2012

Lara Bar

Lara's Theme from Doctor Zhivago goes from this waltzy, shmaltzy, merry-go-round tune to something that belongs in a horror movie.  Here's the scary part drenched in reverb to make it even scarier: [MP3].

Posted: 9/20/2020 10:26:27 AM
pitts8rh

From: Minnesota USA

Joined: 11/27/2015

I was going to asked what you used for a stimulus that was so periodic, then I saw that you did this remotely.  How would you characterize the new resonator sound versus the old - what am I listening for?

I have to admit that for a long time (before I built the prototypes) that I didn't understand how the resonator worked or what it was there for.  Then after playing with it a while I began to figure out that it had an impulse response like a drum where you could vary the tension and decay.  Whether it's the right idea or not I having been trying to tune it to match what I think the body resonance of an instrument would be if you could give it a tap with a reasonably hard object.  I don't have any cellos lying around, unfortunately.  Maybe I should hide a recorder in my pocket and go to a music store. They might get suspicious if I go around thumping instruments, though. 

The range of effects that the resonator offers is much greater than I ever would have expected.  I's also a little surprising how you can get some pretty credible vocals with the resonator alone with no discrete formant settings.

Posted: 9/20/2020 2:38:49 PM
dewster

From: Northern NJ, USA

Joined: 2/17/2012

"How would you characterize the new resonator sound versus the old - what am I listening for?"  - pitts8rh

It's essentially the same, but absolute decay time is somewhat more constant WRT changes of the freq knob (which the recording sort of demonstrates, though there is no before / after in there).  It accomplishes this by generally bypassing the LPF more, thus brightening up the overall output a bit.  For many presets you may want to reduce reso a skosh, and perhaps bump xmix up (in an absolute value sense as this is a +/- knob) a tad.

The knobs work this way internally (as before, this was just a tweak):

The freq knob mainly controls the depth of the overall delay (though for convenience the knob displays frequency - delay period is 1/f).  But it also controls the crossfade bypass of the feedback LPF, selecting higher bypass for higher settings - which tends to move the LPF out of the way, facilitating longer HF decay.

The reso knob mainly controls controls feedback, or recirculation gain.  But it also controls the feedback LPF cutoff frequency, selecting higher cutoff frequency for higher settings - which also tends to move the LPF out of the way, facilitating longer HF decay.

High frequency decay faster than low frequency decay is a natural phenomenon for the vast majority of physical resonators, and the feedback LPF is there to implement this and to generally "tame" the recirculated higher frequencies (which can sound strident / metallic otherwise) by attenuating them a bit more than lower frequencies.  It's a first order filter made even milder by being quite often largely bypassed.  But it doesn't take much attenuation at all to quickly drive signals into the dirt via multiple recirculation passes (IIRC the original Karplus-Strong string sim used 16 bit sample truncation of the LSb to do decay). 

You can do decay either by a slight attenuation across the board, or via a frequency dependent attenuation (i.e. LPF).  The former doesn't control HF decay very well, while the latter doesn't control LF decay very well.  Combining them is the way to control both high and low end attenuation, and carefully combining them for minimal knob count and maximal user convenience is the trick.  When these were separate controls I was having to constantly set them both to pretty much the same thing (the way they were scaled it just happened to work out that way) which started feeling like a minor chore, so the impetus to combine them existed previous to restricted knob real estate, and seemed like a natural thing to do.  Also, early on it didn't have the LPF crossfade in there, so it couldn't do really long high frequency delays, and of course that's yet another thing in the feedback path which requires some form of indirect scaled control.

"The range of effects that the resonator offers is much greater than I ever would have expected.  I's also a little surprising how you can get some pretty credible vocals with the resonator alone with no discrete formant settings."

The credible vocal thing was completely out of the blue.  It's like a dog walking on its hind legs and doing it really well.  If I had to choose between the formant bank and the resonator, I would pick the formant bank - but it would be close, and there's some synergy between them.

[EDIT] The ~recent changes (from pseudo stereo on) to the resonator have tended to brighten it up - though this is really a removal of dullness rather than an increase in brightness.  I haven't actively set out to brighten it up, it's just that rational topological and control weighting changes have produced that as a side effect.  If anything the resonator response is more flat than ever - which I believe is a good thing, as I'm finding that I don't have to counteract the previous dullness via a boatload of treble boost and the like.

Posted: 9/21/2020 9:54:37 PM
dewster

From: Northern NJ, USA

Joined: 2/17/2012

plates! Plates!! PLATES!!!

Redesigned the LED tuner mount to be stylistically similar to the pitch and volume antenna plate mounts (here it is sitting above the pitch plate, and on top of the volume plate being use here as a temporary photo support, the sides of which are slightly visible in-between):

The width (155mm) and thickness (5mm) are the same, as are the mounting holes.  It only took a couple of hours to print, and required very little in the way of plastic as I've got all that minimized for prototyping, which yields a very lightweight yet rigid part:

Here it is printing, 2 layers all around and 15% cubic infill.  Lots of nubs and webs because I've got retraction turned off - which works well for the antenna plates, but not so much for the tuner.  Took a while with a razor knife, reamer, and countersink to get it cleaned up (never again).

Next up: the main control unit will be given the same treatment (de-doghousing and en-platening).  I'm out of gray PLA, will have to switch over to my reel of shiny black PETG.

Thank you Roger for dragging me kicking and screaming into the 3D printing world!  It's something everyone should learn if given a real need to.  And given the real need it's not entirely unpleasant.

Posted: 9/22/2020 9:17:43 AM
pitts8rh

From: Minnesota USA

Joined: 11/27/2015

First it was fire, then the wheel, and finally the Ender 3 with a flex plate.  All you need...

I had been intending to send you a sample of that 1/8" mirrored acrylic sheet that I bought for my first prototype for possible use as an antenna plate.  It's something to keep in mind as something you might be able to combine with a printed structure or even an enclosing backshell. Another possibility is to use regular colored acrylic with 2" self-adhesive aluminum tape (sold for ductwork) applied to the backside.  The acrylic can be easily curved or bent into self supporting structures with a simple heating jig. Making a reliable gas-tight electrical connection to any thin aluminum is a little tricky, although I suppose you could apply a small patch of copper tape to the aluminum that you could solder to.  I don't think a big series C is going to hurt on an antenna. Or just use real aluminum sheet behind the plastic.  It's not that hard to cut.

The acrylic is also easily machined to any shape you want by rough cutting and then finish-routing to shape against a template.  I guess the point of this would be that it doesn't need to be flat and the surface finish is more presentable than the printed one.  In fact, this could apply for all your face panels (like on Dominik's latest Uberwave).

I'm curious why you had retraction turned off.  I've done it too just to see what happens, and the hairy mess that I ended up with wasn't entirely unexpected, but yeah, never again.  BTW, if you find that stringing is a major problem when you go back to PETG, the conventional wisdom is to print cooler to prevent oozing.  But for whatever reason I've found that printing hotter actually works better, and it also keeps the nozzle cleaner.  Little wispy strings seem harmless but they touch the nozzle and accumulate into big blobs that drop somewhere else on your print.  When printing hotter (like 250C or even 260C, assuming that you don't keep any pet birds in the house) the plastic is more fluid and seems to be less inclined to drag into strings.  You do need to make your travel moves fast because of that fluidity (try 180-200mm/s for travel moves with 1250 mm/s^2 acceleration).  I don't know if your printer firmware has accel limits in the firmware that might override the Cura (Expert) settings, but you can always modify that if you wish.

Didn't I send you some transparent red stick-on material?  That was intended as a contrast filter for the 7 segment display, if you choose to use it.  I have plenty more, so don't be afraid to try it.

If you intend to put all of these modules in a wood cabinet, I can whip one up for you.  Either functional for a prototype or pretty .

Posted: 9/22/2020 3:03:44 PM
dewster

From: Northern NJ, USA

Joined: 2/17/2012

"Making a reliable gas-tight electrical connection to any thin aluminum is a little tricky, although I suppose you could apply a small patch of copper tape to the aluminum that you could solder to.  I don't think a big series C is going to hurt on an antenna. Or just use real aluminum sheet behind the plastic.  It's not that hard to cut."  - pitts8rh

Yes, if I keep going this route I'll get some form of heavier sheeting, though not as heavy as flashing, which is just too rigid and springy.  I have my eye on some disposable cookie trays.  With something thicker you could affix an actual fastener to it, though copper foil or tape would probably be easier.  I worry about tape not forming a conductor, and I worry about dissimilar metals doing the electrolytic thing.  Bare wire wrap pinched by the coil base seems to work really well though, and there's very little current transfer.

"I'm curious why you had retraction turned off.  I've done it too just to see what happens, and the hairy mess that I ended up with wasn't entirely unexpected, but yeah, never again."

I did it on a lark (I was feeling lucky) just to see how the antenna plate might turn out - it significantly shortened the printing time and came out pretty much OK, but I don't know if I would do that for production (it left blobs in screw holes that were difficult to cosmetically remove).

I've gone from inverted radii on these front panels to 45 degree chamfers, which looks a lot crisper when printed (duh!).  Inverted and non-inverted 45 degrees is a simple way to force the slicer into giving you the strength of wall layers during a structural transition, and it's an easy parametric calculation in SCAD.  I'm using it everywhere I can now.

"BTW, if you find that stringing is a major problem when you go back to PETG, the conventional wisdom is to print cooler to prevent oozing.  But for whatever reason I've found that printing hotter actually works better, and it also keeps the nozzle cleaner.  Little wispy strings seem harmless but they touch the nozzle and accumulate into big blobs that drop somewhere else on your print.  When printing hotter (like 250C or even 260C, assuming that you don't keep any pet birds in the house) the plastic is more fluid and seems to be less inclined to drag into strings.  You do need to make your travel moves fast because of that fluidity (try 180-200mm/s for travel moves with 1250 mm/s^2 acceleration).  I don't know if your printer firmware has accel limits in the firmware that might override the Cura (Expert) settings, but you can always modify that if you wish."

Ah, thank you for that info!  I'll experiment around with them today.

"Didn't I send you some transparent red stick-on material?  That was intended as a contrast filter for the 7 segment display, if you choose to use it.  I have plenty more, so don't be afraid to try it."

Yes, and thank you!  It's funny, but the 7seg on P1 behind slightly milky plastic seems much easier to read than the bare display, which really washes out, so it will definitely benefit from the filter you sent when I apply it.

"If you intend to put all of these modules in a wood cabinet, I can whip one up for you.  Either functional for a prototype or pretty ."

Thank you!  I'm going to get really weird on it shortly - all in the name of science, you understand - but after that may be back on the long search for suitable cabinetry.

Posted: 9/22/2020 3:42:31 PM
pitts8rh

From: Minnesota USA

Joined: 11/27/2015

"Yes, if I keep going this route I'll get some form of heavier sheeting, though not as heavy as flashing, which is just too rigid and springy." - Dewster

5052 or 6061-T0 aluminum is what you want if you ever decide to buy the raw material.  5052 in the easiest to hand-form.

 "With something thicker you could affix an actual fastener to it, though copper foil or tape would probably be easier.  I worry about tape not forming a conductor, and I worry about dissimilar metals doing the electrolytic thing. "

That's why I mentioned the series C.  Most copper tape has non-conductive adhesive, so if you make any direct connection it will just be incidental.  And that removes any galvanic concerns, too.  Practically speaking these are really low priority concerns.  I think in most cases one wants to tend to these details just in case your product ever gets in the hand of P.I.T.A. engineers that pull it apart to look for bad design.  Like us!

"I've gone from inverted radii on these front panels to 45 degree chamfers, which looks a lot crisper when printed (duh!)."

They look crisper for a reason, and 45 degree chamfers should always be used instead of radii for lower edges.  Without supports you generally can't print overhangs that exceed 50-70 degrees depending on layer height and your printer, and an inverted radius will have problems with the filament trying to print in air for the first few layers.  This is really noticeable on large radii.  A chamfer on the other hand will be printing a 45 degree angle from the second layer onward, so the ever-growing perimeter of filament always has something to rest on.  That's why you'll usually see hexagonal holes (with the point, not the flat, on top) instead of round ones in the sides of 3D printed parts.

"Thank you!  I'm going to get really weird on it shortly - all in the name of science, you understand"

That's too much information.  I'm outta here...

You must be logged in to post a reply. Please log in or register for a new account.