


Guitar face, eh?
Why, that very instrument allows key players to be as cool as guitarists, didn't you get the memo?
cool keys
Let's Design and Build a (mostly) Digital Theremin!
Posted: 6/4/2020 6:25:26 PM
Posted: 6/4/2020 9:20:19 PM

Ooh, I didn't know about Keith Emerson's sad death. RIP.
=============
Another day of printing, this time an LCD / encoder / button panel for a PRUSA 3D printer that Roger pointed me to:
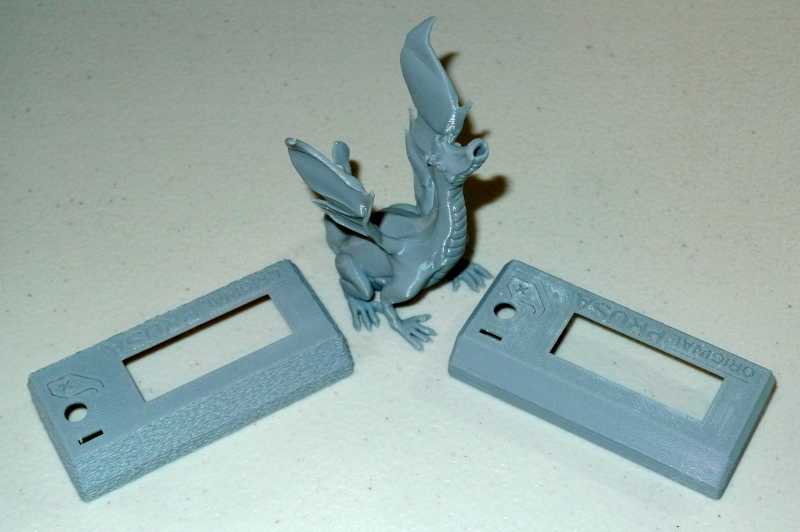
The one on the left has the "fuzzy" feature turned on in the Cura slicer SW with default values. The one on the right has it toned down so far it isn't really doing the job. Also on the right, I used concentric fill for the face layer, and I'm not sure it's an esthectic improvement. Roger uses a textured mat on the printer bed to good effect here. These, including the singing dragon in the center (seen in one of the Amazon reviews for Overture PETG plastic - I couldn't help myself), were printed 1/2 scale.
Not seen in the back is an open slot that goes all the way down to the desk, and the Cura SW interpreted this to mean I wanted the fuzzy on the inside for those layers (the rest of the inside is non-fuzzy). I suppose it's time to get a textured mat, a bigger nozzle, and some PETG, as this seems like fertile ground for D-Lev construction (one of these for the LCD & 8 encoders, another to house the LED tuner).
Posted: 6/5/2020 10:43:24 PM
Reverb vs. Pseudo Stereo
Was pining away for reverb before I implemented pseudo stereo with the inharmonic resonator, but not nearly so much since. Reverb definitely has its place, but surprisingly I'm finding fake stereo substantially floating my sonic boat. Maybe all I need is some ambience? I'm slathering it on everything!
Posted: 6/7/2020 8:44:28 PM
Roger's Nuts!
Spent much of the day watching OpenSCAD tutorial videos on YouTube, a great way to learn software quickly. It's script driven, which means you deal with various combinations of primitive constructs via a language, and then render the results. For my first attempt I thought I'd plunge right in and replicate a part that Roger designed, a 1" - 12 threads per inch (fine thread) hex flanged type nut. Found a nice thread library (https://www.dkprojects.net/openscad-threads/) and about 1/2 an hour later had a design ported to my Ender-3 printer (which took about an hour to print it):
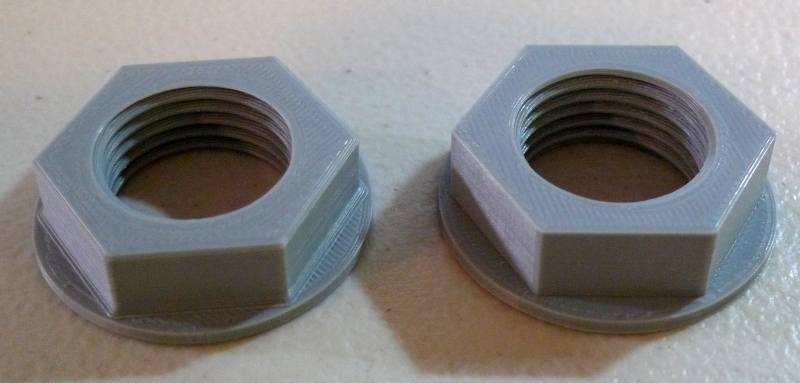
Roger's nut is on the left, mine is on the right. I didn't bother doing any filleting or beveling (which would help with strength and looks), but the thread is chamfered on each end, which is an option in the thread generator (it takes the razor edge off the ends, and makes it easier to start). I also made mine a bit taller (1/2") just for the hell of it. It fits the other part tighter than Roger's does, so it might benefit from some slight scaling up in X & Y.
Fun stuff! I've got a reel of black PETG on order.
===================
Working on all my presets. Here's a trumpet: [MP3]. I'd like to enter a mode soon where I'm making at least one preset per day. The librarian is working really great in Linux, I need to update the Win10 build and get Roger banging on it.
Posted: 6/8/2020 11:43:17 AM

"Roger's nut is on the left, mine is on the right. I didn't bother doing any filleting or beveling (which would help with strength and looks), but the thread is chamfered on each end, which is an option in the thread generator (it takes the razor edge off the ends, and makes it easier to start). I also made mine a bit taller (1/2") just for the hell of it." -Dewster
Of course you had to make yours bigger, didn't you?
Before you perform any scaling adjustments to make parts tighter or looser it's a good idea to check your printer calibration by printing and then measuring a calibration cube. If any of the sizes are off you can use M503 to read out your current eeprom stepper calibrations (G92) and scale the numbers for whichever axes need adjustment. Use the G92 command to enter the new stepper numbers and print a new cube. When everything looks right you can use M500 to store the settings. It's worth checking your extruder calibration as well before you get too heavily invested in making customized profiles.
Cura does have a special adjustment that allows you to tweak internal hole sizes without affecting any other dimensions. I don't know how effective this is.
"The one on the left has the "fuzzy" feature turned on in the Cura slicer SW with default values. The one on the right has it toned down so far it isn't really doing the job.
That is some serious fuzz. With high acceleration I think my printer would shake itself off the table doing that.
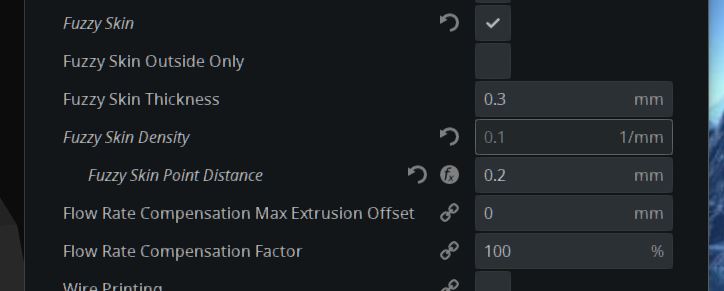
Below are the settings that I have been using on most everything so far (with layer height of 0.2 or 0.16mm). I should add that "Fuzzy Skin Outside Only" is almost always checked to avoid the fuzz printing on inside surfaces. If you don't have that option you might need to install the latest version of Cura. Sometimes you have to design a thin breakaway wall into your part to keep Cura's fuzz from going where it shouldn't.
At least one newer CAD program (Solidworks 2019 or 2020, I think) is adding printable textures as a feature, which would be much more versatile than letting the slicer try to do it. But I don't have that software and I doubt that my computer would have the horsepower to handle it. So for now, it's Cura Fuzzy or nothing.
BTW, If you don't like the look of concentric fill (I like it for gears and wheels but not much else) try the usual grid or zig-zag but set your top/bottom and skin line directions to [0,90]. I think it looks a lot better than the default 45/135.
Posted: 6/8/2020 3:01:52 PM
"Of course you had to make yours bigger, didn't you?" - pitts8rh
Ha ha! ;-)
"Before you perform any scaling adjustments to make parts tighter or looser it's a good idea to check your printer calibration by printing and then measuring a calibration cube. If any of the sizes are off you can use M503 to read out your current eeprom stepper calibrations (G92) and scale the numbers for whichever axes need adjustment. Use the G92 command to enter the new stepper numbers and print a new cube. When everything looks right you can use M500 to store the settings. It's worth checking your extruder calibration as well before you get too heavily invested in making customized profiles.
Cura does have a special adjustment that allows you to tweak internal hole sizes without affecting any other dimensions. I don't know how effective this is."
Thanks! I did this a while back, but ended up not have to adjust anything - other than tightening up the x axis belt, that is. The part this nut fits to was printed before the "belt tightening" and that could be some of the source of the friction. Even so, the fit is snug but not overly tight, and would probably be OK for production.
"That is some serious fuzz."
You're telling me, its crazy fuzz when using the defaults.
"Below are the settings that I have been using on most everything so far (with layer height of 0.2 or 0.16mm). I should add that "Fuzzy Skin Outside Only" is almost always checked to avoid the fuzz printing on inside surfaces. If you don't have that option you might need to install the latest version of Cura."
Your numbers for Fuzzy Skin Thickness / Density / Point Distance are [0.3, 0.1, 0.2]. In the version of Cura I'm running (v4.6.1) the defaults are [0.3, 1.25, 0.8]. I do have "Outside Only" checked.
"Sometimes you have to design a thin breakaway wall into your part to keep Cura's fuzz from going where it shouldn't."
That makes sense, otherwise it can't differentiate between inside and outside.
"BTW, If you don't like the look of concentric fill (I like it for gears and wheels but not much else) try the usual grid or zig-zag but set your top/bottom and skin line directions to [0,90]. I think it looks a lot better than the default 45/135."
Excellent advice, thanks!

Posted: 6/8/2020 6:41:10 PM
At least one newer CAD program (Solidworks 2019 or 2020, I think) ... But I don't have that software and I doubt that my computer would have the horsepower to handle it.
Also, a annual subscription fee of ~ 1300 USD might be a slight turn-off?
Posted: 6/8/2020 7:21:08 PM
"on your nuts and printing machine" - ILYA
Ha! Now I want durralloy nuts on the D-Lev!
"Also, a annual subscription fee of ~ 1300 USD might be a slight turn-off?" - tinkeringdude
And probably half of it or more is based, one way or anther, on open source, monetizing and locking away the freely given kindness of strangers...
Posted: 6/9/2020 5:42:33 PM
Bb Clarinet
The spectrum of the lowest note (D3, 143.86Hz) of a Bb clarinet looks like this:
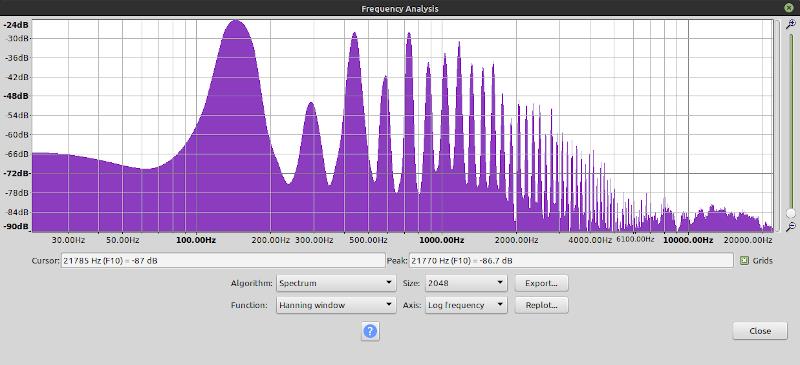
I used an FFT sample size of 2048 here to widen the "hills" and make them more visually obvious. The main thing that jumps out at you is this starts out as odd harmonics on the low end and gradually blends to all harmonics at ~1.2kHz and above. Another feature is the lowest harmonic levels are roughly the same amplitude.
The D-Lev oscillator bank can do odd / all, and any static mix, but it isn't set up to do a frequency dependent blend like this. One way to approximate it is to take an all harmonic source, and place tracking (pitch modulated) band pass filters (formants) at the lowest odd harmonics, to emphasize them at the expense of the even harmonics. This allows us to set the relative amplitudes of the odd harmonics as well. For the upper all harmonics blend, the inharmonic resonator output is set to highpass crossover at 1.2kHz, and the bypass xmix adjusted to set the upper harmonic levels. A bit of "odd" is added to the oscillator, which seems to help, even though that isn't clearly called for in the spectrum. Significant resonance can be added via the formant and resonator "reso" knobs:
Here's what it sounds like, (D3 real, D3 synth; D4 real, D4 synth; D5 real, D5 synth): [MP3]. Pseudo stereo doesn't seem to work very well here, unfortunately, as the resonator is doing too much work otherwise. If I were making a clarinet synthesizer (or, indeed, a general woodwind synth) I'd try giving the oscillators a frequency dependent blend, and all of this would be much more straightforward, and perhaps more realistic sounding?
As a result of working on this voice, I modified the resonator mode=0 bypass to include the high pass filter, but I ended up not using it for this patch. Full bypass of the resonator is now done only by setting xmix=0 regardless of mode, which makes sense. And the availability of another HPF in the signal chain never hurts, particularly when it's free.
[EDIT] Here I've transposed the oscillator and formants down one octave, and the resonator is in pseudo stereo mode: [MP3]. Sound pretty woody!
You must be logged in to post a reply. Please log in or register for a new account.