


"Take your time and have some holidays!"
I'll take that as an order! :-)
==============
The Cello & Early Synthesis
For all I've read about him, for some reason I didn't know that Theremin played the cello. As did Maurice Martenot. Hmm.
Hive v13.04 - Finally Done?
I think the design of my Hive soft processor is finally done! For those new to this thread, Hive is a general purpose processor written in SV (SystemVerilog) HDL (Hardware Description Language). It's a 32 bit stack / register hybrid barrel processor with 8 threads that runs at ~180MHz in the low-end Altera (now Intel) FPGA (Field Programmable Gate Array). Hive is the processor I'm using as the core of my D-Lev FPGA-based digital Theremin, and there are special Hive peripherals I wrote in SV to support the functionality necessary (pitch & volume LC DPLL & CIC downsampling, SPDIF TX controller, UART, Flash SPI controller, LCD controller, LED tuner controller, encoder conditioning, etc.).
The last major change to it was the inclusion of "travelling flags" on the stacks which facilitate signed saturation and unsigned limiting of arithmetic and shift results, which I'm using the hell out of in the DSP assembly code. Yesterday I re-implemented (they were removed at one point) immediate ADD, OR, and XOR, as well as reverse subtraction. I know I said I probably wouldn't put the reverse subtraction opcodes back, but when they're available they often get me out of a mental bind when I'm coding.
The inclusions are situated quite nicely in the opcode space, and I shuffled the opcodes around a bit more to increase orthogonality (and thus make the decode simpler and faster). The simulator and verification assembly have been updated to reflect the new changes.
I can't think of any way that I'm not pretty satisfied with Hive at this point, so YAY! Designing a processor and learning DSP have been two major life goals of mine (designing and implementing the HAL assembly language and Hive simulator came along for the ride). And perhaps only a bit more to go now on my goals regarding the D-Lev prototype.
Hive core & D-Lev peripheral SV code: [LINK]
Hive simulator / assembler / verification & D-Lev assembly code: [LINK]
Eric,
Do you have a basic procedure somewhere for the whole FPGA/EEprom programming procedure? I'd like to at least give it a try, following a written procedure on my own, before resorting to the Teamviewer hand-holding where I would be guaranteed to forget what I did as soon as it was over.
If you don't already have something, I wouldn't ask that you to take a lot of time writing up every detail, especially with the holidays coming up (and I don't really need it that soon for the same reason). I could start with just an outline, perhaps pointing out any of the key pitfalls that you warned of, and I can just prompt you for any questions that come up. I think that would put me in a better position to write up a streamlined "FPGA Pumping for Dummies" for the other build-specific thread. But if you have or want to do a detailed procedure, that would be great too.
I think I'm almost ready to go ahead with software. I had a little fit problem when I tried to install the panel on the wood enclosure that required changing the encoder board headers to right angle, but that is fixed now. I am still impressed by the relative simplicity of the hardware side. This has been a very fast and easy build. I'm bracing for some major wiring eff-up if I grossly misinterpreted something, but everything is fixable with cuts and blue (not white) wires. I'll just make sure that all the beauty-shot photos of the hardware are posted before that happens.
Thanks,
Roger
PS: I going to try to look at the Voicelive this weekend. If I can't verbally describe what is happening, I'm thinking of making a video of a couple displays showing input versus output pitch for various settings, but I want to avoid that if possible.
FPGA Pump Instructions (for Quartus II v10.1sp1)
Setup:
1. Unzip the latest D-Lev SV (HIVE_SV_2018-12-07_v13.04.zip) and stick it somewhere.
2. Install & fire up Quartus II v10.1sp1.
3. Tools | Options... | General | "Default file location" (at bottom) navigate using the "..." button to the location of the D-Lev SV code.
4. Tools | Options... | General | Internet Connectivity | uncheck all boxes (this makes Quartus start up faster).
5. Plug in USB programming dongle and install drivers (if necessary).
Compile:
1. Fire up Quartus.
2. File | Open Project...
3. Navigate to the D-Lev SV directory "Q10.1sp1" and open the file "ep4ce6e22c8_demo_board.qpf".
4. Processing | Start Compilation... (will take a few minutes and should generate 5 warnings & no errors).
5. Table of Contents (window pane) | TimeQuest Timing Analyzer | Slow 1200mV 85C Model | Fmax Summary | pll_core s/b > 180MHz.
6. If pll_core clock is below 180MHz change the seed and recompile: Assignments | Settings | Fitter Settings | Seed | Apply | OK | step 4.
7. File | Convert Programming Files... | Open Conversion Setup Data... | open file "ep4ce6e22c8_demo_board.cof" | Generate | Close.
FPGA Serial Configuration Device Programming:
The FPGA configurator pump is the weakest point in the chain and therefore the most difficult to explain. Even if the USB programming dongle is plugged in 24/7, Quartus will "forget" it now and then. And the initial JTAG chain setup can be a pain as the auto detect process for some reason can't auto detect the exact serial configurator device, so you have to tell it (EPCS16). But once you get past the initial pump successfully then the other settings somehow stick pretty well. It's controlled by a *.cdf file in the Q10.1sp1 directory.
1. Fire up Quartus and open the project file. Connect the programming dongle to the FPGA board either before or after this (see warning below).
2. Tools | Programmer | if you don't see the "USB-Blaster" next to the "Hardware Setup" button: Hardware Setup... | USB-Blaster (double click) | Close.
3. (A miracle occurs) Do whatever you have to do to make the programmer dialog look like this:
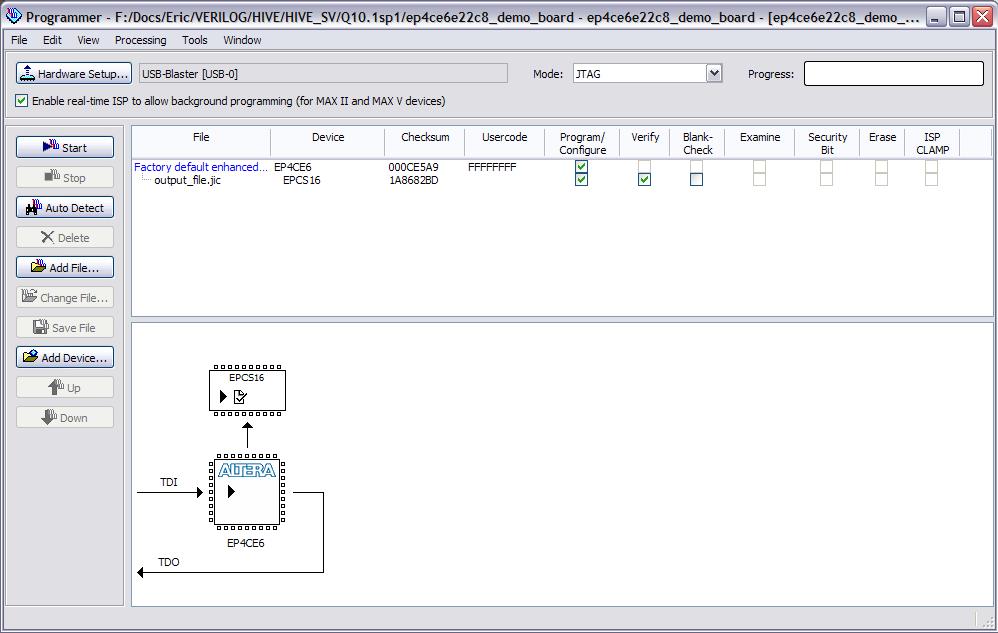
4. Click the "Start" button. If you see "Failed" in the "Progress" bar: close & open the programmer and try again (!).
5. Power cycle the FPGA board to pump the FPGA itself with the new configurator load.
Warning: If you are using a genuine Altera USB-Blaster programming dongle, you must be very careful how you connect it to the FPGA programming header! Specifically, you must avoid situations where the dongle is connected to the FPGA board but disconnected from USB (powered-down) while the FPGA board is powered-up. (The opposite - dongle powered-up and FPGA board powered-down - is fine.) I have no experience with other dongles, but it wouldn't hurt to be careful here regardless.
Default Hive SW Load
The FPGA load has a default, fully functional D-Lev software load for the Hive processor "built-in" to the block RAM at the time the FPGA gets pumped by the serial configurator device. So you should get a working D-Lev Theremin even if the D-Lev EEPROM isn't hooked up, or if the EEPROM load is corrupt. The boot portion of the FPGA default load wakes up and checks the EEPROM SW load CRC, and if the CRC is good it overwrites the FPGA default SW load with the EEPROM SW load and starts things up (there is a bit more delay added to let the oscillators settle and auto-cal, boot takes ~1 second). You can force a default load by depressing encoder 7 during powering up.
Default Hive SW Load Updating
The default FPGA D-Lev load is contained in these four files: "hive_0.mif" "hive_1.mif" "hive_2.mif" "hive_3.mif" which are automatically generated at the time of HAL assembly (to be addressed in a separate post). To update the default FPGA D-Lev load without having to recompile the FPGA:
1. Copy "hive_0.mif" "hive_1.mif" "hive_2.mif" "hive_3.mif" from the Hive simulator directory to the Q10.1sp1 directory (overwrite the files there).
2. Fire up Quartus and open the project file.
3. Processing | Update Memory Initialization File.
4. Processing | Start | Start Assembler.
5. File | Convert Programming Files... | Open Conversion Setup Data... | open file "ep4ce6e22c8_demo_board.cof" | Generate | Close.
6. Reprogram the FPGA serial configurator & power cycle.
Good luck Roger! You've got my contact info if you hit a brick wall. I'll update the above instructions with any feedback you would like to provide.
1) At what point in this sequence does the FPGA board itself get connected to the blaster, or doesn't it matter?
2) What about the eeprom?
3) I have the Waveshare dongle that you recommended - is it immune to the unpowered-state connection issue that you warned about or should I still observe the same cautions?
Assembling & EEPROM Pump (WinXP)
Hive Simulator Setup:
1. Unzip all files (the latest archive is "2018-12-07.zip") to a folder and make a desktop shortcut to "hive_sim.exe". (I don't normally archive the EXE file in the zip file, but I did so for this latest one.)
2. Right click on the shortcut and click the "Options" tab, set "Command history" "Buffer size" to 48.
3. Click the "Font" tab and pick 8x12 raster fonts.
4. Click the "Layout" tab and set both "Screen buffer size" and "Window size" to 128 x 48.
5. Apply and close, then run the shortcut to see if everything is OK. You should see successful assembly results, then the simulation screen.
Tera Term Setup:
1. Install Tera Term, make a desktop shortcut.
2. Setup | Serial Port |
- Baud rate: 230400
- Data: 8 bit
- Parity: none
- Stop bits: 1
- Flow control: none
3. Setup | Terminal |
- New-line Recieve: AUTO
- New-line Transmit: CR
- Local echo: none
You can set the Tera Term baud rate and port defaults via the shortcut "Target": "C:\Program Files\teraterm\ttermpro.exe" /BAUD=230400 /C=5
Serial Port Test
1. Connect the serial port to the FPGA board, start Tera Term.
2. Press the enter key. This should produce a question mark (return is an unrecognized control character) followed by greater than (the ready prompt).
3. Type "0 9 rr " without the quotes or return, and with the final space. This should list the contents of the first 10 internal Hive registers.
Assembling & Uploading to EEPROM
The Hive simulator automatically assembles HAL (Hive Assembly Language) code when it is opened in the simulator. This produces the Tera Term script file "hive.ttl" which can be uploaded to the Hive processor on the FPGA demo board via UART serial port, in order to program the D-Lev EEPROM.
1. Start and close the simulator to assemble (the default input file is "theremin.hal").
2. Start Tera Term.
3. Control | Macro | navigate to and select "hive.ttl" | Open.
4. Stuff should stream by for ~15 seconds, followed by a CRC check producing "debb20e3", followed by "BL" which indicates successful boot via EEPROM. If it hangs or stalls out at any point just close Tera Term, reopen it, and do steps 3 & 4 again (Tera Term seems to get tired now and then).
Presets & Clearing
The presets are also stored in the EEPROM, but they are not a part of the software load. So when your D-Lev comes up for the first time it probably won't do much in the way of Theremin-ish stuff, though it should show you functioning menu screens and a maybe stuck tuner. I'll address this in the next post.
There are a couple of text files in the zip archive regarding the use of the simulator, as well as the HCL serial port command line interpreter.
Presets
To get your shiny new D-Lev to do anything it will need presets, which unfortunately are not part of the software load. I've been concentrating more on the DSP data path and parameter tuning and whatnot, as these need to be somewhat set in stone for presets to have any meaning. So, no librarian yet.
Preset Area Initialization
At this point you will have to manually enter and save your presets, but the default EEPROM state of erased = 0xFF will fight you by maxing everything out (I probably should have inverted the data sense here). So at this point I would recommend you run this TTL script that zeros out the preset area: [LINK]. It's kind of long, so it may hang up / stall out. If so, re-run it. It may also corrupt the program space, so you may have to repump the D-Lev EEPROM program area afterward. But you only have to zero things out this once, so get through it as best you can.
Preset Types
There are 256 presets, [0:255]. Preset #0 is special in that it is reserved for system parameters, which are common to all presets. You can store to preset 0 but you can't explicitly load from it, instead it is loaded whenever you load a user preset, and at power-up. All presets slots are programmable, none are read-only as in many electronic instruments. There is no "factory reset" as of yet. Presets unfortunately don't have assignable text names, just the number of the slot you saved it to.
Preset Load [1:255]
To load a preset (set the current settings), go to the default UI screen "MAIN" and twiddle the "LOAD" knob to the slot containing the preset you want.
Preset Store [0:255]
To store the current settings from a preset, go to the default UI screen "MAIN" and twiddle the "STOR" knob to the slot you want to store it to, then press the "STOR" knob. If the slot is #0 then only system parameters are stored.
Preset Copy [1:255]
Say you want to make a new preset #10 based on another preset #2. You simply load preset #2, work on it, then store it to preset #10.
Say you want four presets #50 - #53, to be different vowel sounds of the same basic voice of preset #99. Load #99, store to #50 - #53, load #50, edit #50, store #50, load #51, etc.
Preset Default
When you store preset #0, whatever preset is currently loaded (i.e. the slot the "LOAD" knob is set to) will be the power-up default preset.
Some Parameters
To get things up an running with a minimum of fuss, here are my current system parameters (store to slot #0):
PITCH
- lin : 3
- ofs- : 43
- sens : 69
- ofs+ : 91
VOLUME:
- lin : 3
- ofs- : 29
- sens : 82
- ofs+ : 60
- rev: 1 (you may want 0 here for normal axis sense)
TUNER:
- brit : 0
- step : 4
- mode : 1
- pre : 1
- note : 0
- oct : 0
MISC
- pcal : 20
- vcal : 20
- 50Hz : 0
To get a male vocal "ooh" sound, set these non-sysem parameters and store to a non-zero slot of your choice:
MAIN
- vol : 63
P_CORR
- velo : 12
- rate : 23
- step : 10
- corr : 31
ENV_GEN
- hght : 12
- knee : 5
-rise : 0
- fall : 19
SOURCE
- mult : 1
- harm : 16
- vmod 15
- nois : 0
- osc : 22
- oct : -1
- pmod -3
FORM_0_2
freq : 467
freq : 762
freq : 2554
reso : 29
levl : 63
levl : 63
levl : 60
sel : 3 (next page)
Axis Nulling
If you've gotten this far, the axis nulling works like this:
- Power up does an auto-cal. If you're fine with how it's working you're done. The check here is getting the same open/closed hand interval response (as seen on the tuner) when the hand is close to and far away from the pitch plate.
- On the MAIN UI screen turn the "acal" knob to the right at least once in order to do an auto-cal of both axes. Do it standing with your body in the playing position but hands away from the plates.
- To trim the auto-cal, adjust "pnul" on the MAIN or PITCH screens, "vnul" on the VOLUME screen.
- System parameters "pcal" and "vcal" are the numbers that get assigned to "pnul" and "vnul" during an auto-cal, so you can trim the auto-cal with these (and save to #0) if it seems to be consistently off by too much.
I usually have to do an auto-cal after power-up (as my body usually isn't in position), and sometimes later as the temperature changes, etc. I often adjust "pnul" a bit after an auto-cal, but never "vnul".
You must be logged in to post a reply. Please log in or register for a new account.
